Friday, 20 July 2012

Charms after soaking overnight

Well what a difference a night makes - and what a variety of results!

I am really rather puzzled by the look of them so far!
The iron ones (black leaf, egyptian lady head, and bird head bottom row)  didn't look any different last night - but they are looking rusty now, and the egyptian snake headed lady is really now showing up.  The patina on the other metals is really showing up.   It's a bit scary.  There are 38 hours to go yet, and I haven't a clue what they will look like.  I really want all the raised textures to be shiny and recesses to be patina.   Yikes, I think I best make some more charms to be on the safe side or I'll run out of time!

Thursday, 19 July 2012

I couldn't help myself.......

 I'm not going to write many words as it so late!
I would not have been able to sleep if I hadn't given the charms another coat of paint, then added the patina.  So despite the late hour I just had to do it!  So at 10.45pm this is what they looked like!
 Then as per instructions - whilst it was still wet
 I brushed on the patina
 I think that I was a bit heavy handed with that
 So it will be interesting to see what they look like, and its a learning curve!
 You have to leave it for 48 hours.
If they look any different to the above tomorrow lumch time I'll post some more pictures.

I didn't waste any time with Verday

I just couldn't contain myself having opened the parcel!
Why wait until tonight?
This was the first three I painted - but of course they get more coats of paint.

It took me by surprise as for some reason I was expecting the paint to be thick but they were runny which is a good thing as you don't lose the fine detail.
These were the next three - so a better job - and you can begin to see the head is Egyptian on the right
This covered the white rather well.

 This covered well, when I painted it on I did it really thickly - but there are a couple of air bubbles which I had to pop.

Please remember that all these pictures are far bigger than the items themselves, as you can see in a couple of posts previously

 So any little imperfections are magnified!
 These were the last two I painted and have turned out the best so far.
They'll all get at least one more coat or maybe two if they need it - then the patina.

It's fun experimenting.

Looking back at the previous post you can see the vast improvement on the 'naked' ones

Happy Daze are here again.................

Oh you are far to young to know that song - and now it's been stuck in my brain since the post lady arrived with my order from Moira at Happy Daze

 I have been lusting after these for a long long time - but couldn't really justify splurging out on them.
Just looking at the 'stuff' in my craft room drawers that have never seen daylight always fills me with guilt.  Am I just jumping on the fever of the latest 'must have' - like the grunge paper and stuff, or the sheets of unused 12" x 12" filling a drawer to the brim.  

Or those stamps - still lying unused in their unopened packets.  To name just a few things1
But I really really will use these, I promise.

I'll  be experimenting on the polymer clay charms to start with - so watch this space.

And talking of charms, whilst online at the Happy Daze Shop.......

Somehow a pile of charms just happened to slip into my basket.

I'll be unashamedly taking moulds of some of them before using the orignals in art.

Do please, I beg of you, nag me, and nag me if they don't start making an appearance on my blog in he next couple of weeks.

Um..... just spotted a problem.........can anyone point me in the right direction to get seme chains and findings to match the antique charms I have bought please?

Wednesday, 18 July 2012

I'm Charming.........

Well practising at the moment.  I've been so busy with 'appointments'  and urgent gardening work, since I did the poppy tag that I haven't had time to play.

The thunder and lightening going on as I type this is getting a bit scarey - it's gone pitch black and Mr Lottie is out playing lawn bowls - gulp!  (Well he was when I first started typing this - and it's still thundering and now gone 10 pm.)

Anyway, this afternoon I managed to lock myself away in my studio with the leaking roof at the end of the garden and started practising.

(You can click on photos to enlarge) 

I do stress these are my practice pieces. 
They've been baked, but need to be sanded down, polished, and then I'll be making them look like real charms using different techniques.  They will change colour completely so take no notice of the shocking blue back discs etc
 I've joined in another swap so I have to get these done by the end of the month.

 The charms have to be a size that can be worn as a pendant
Or small enough to fit on a charm bracelet.
 You can see how tiny these are can't you.
I am hoping that at least a couple of these will be good enough, once they are finished, to send off.  But I am not expecting too much - and I have beads I can make charms with as a back up

Friday, 13 July 2012

Poppy Tag

I have spent about 20 hours creating this tag - over a number of days - and it's ready to go to it's new home. 

I made several attempts at image transfers before I finally perfected this.
The seed beads were so tiny that the thinnest needle I could get was still too thick to sew them on.
So I had to resort to gluing them on - one by one to create the centres.
I used one of those crafty all purpose glues that (are supposed to just) squirt out of the top once you pull the cap.  Well I followed the instructions and the top shot off like a bullet and sure made a mess for me to clear up!

 I did use some of the glue to add this image transfer quote - well waste not want not!
It inspired me to make this tag especially the 'flushed print' bit - I was getting pretty flushed trying to perfect the image transfers  on to fabric I can tell you!
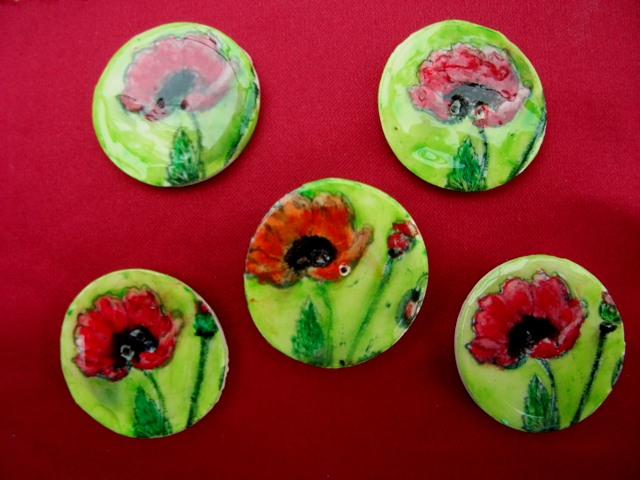
The swap criteria was 'Make a tag to include at least three buttons - and it included a link to show you how to make them out of printed paper/card which were lovely - but I don't have a circle punch so I used polymer clay.  I used a circle cutter to cut out the polymer clay, then stamped the images, and made the holes, baked them, and painted and glazed them once cooked.  It took ages, I have to confess!
I even stamped the reverse - so I have quite a lot of these naked ones!
I bought some transparent 'thread' to sew the buttons on, so as not to spoil the look of the poppies - there was no way that I was going to use that glue again!
I was flummoxed how to attached the poppy fabric to the tag - my sewing is not very good even with a sewing machine - so I had a brainwave!


I used thread that I had teased out of the material and used four strands (one for each corner) and sewed a stitch and tied it in a bow - and added two pale green seed beads to make 'eyes' and if you have a good imagination - you might see the four dragonflys that I do!
 It's been really dark here all day - we had torrential rain - and especially dark in my garden studio so I can't get a good photo.

The tag measures 10.5 inches x 6.5 inches.  
It ended up that large because of the size of the buttons!


Having emailed my swap partner who went for the wooden rustic stick (as opposed to the punched metal eyelets.  Phew glad about that) I was able to finish it off.

It's horrible getting old - to add to all the physical things - the memory goes short term!!!
Last night I brought this in from the garden studio and put it somewhere 'safe' until I heard back from Annie which she would prefer.   And yes - you've guessed it - I couldn't find it today!   At times like that I thank my lucky stars that we downsized to a small bungalow - but there are still lots of places to 'lose' things - especially when you have lots of plastic storage drawers for arty crafty stuff indoors and in the garden studio.  I was almost in tears and neither my patient husband nor me could find it!

It took half an hour to locate it - it was in a drawer in my arty crafty little box room - but you wouldn't expect it to be in one labled 'PAINTS' would you?
I had emptied that drawer - but had forgotten I had and hadn't removed the label, so didn't look there!

So here it is, hanging on my cork board, so I can't miss it, ready to be packed and posted on Monday!
I'll get the packaging ready, labelled and pin it up next to it - I'll not lose it again.

Have a lovely laugh at my absent mindedness - in a kind way I'm sure.

There was one thing that I did not forget  
Our Wedding Anniversary today!

P.S.  Now that I have seen it hanging up, I have just realised that dragonfly's bodies are not two dangly bits like a bow.  Do you think that I should leave well alone - or glue the two bits of thread together to make a proper body?

Sunday, 8 July 2012

Gotta pick a poppy or two

Well I have managed to make five poppy buttons - and I'll be using four for the swap  - just the red ones, although I do like the orange poppy in the middle - but it's a lot thicker button than the rest.  I tried to paint a Meconopsis blue poppy - but it just didn't look right so that hit the bin!

These look better in real life than in the photo - silly me took it in the garden room which has a glass roof so they lighter in the photos than they really are.
I was quite pleased with the glazing - and even more pleased that I left them alone and didn't mess them up!

It's a shame that I have to sew them onto a tag as it'll mess up a part of the poppy - darn it - I wish I had thought of that before.

Looks like I might have to start all over again!

Next is the hardest part for me - trying to make the tag that they have to be mounted on.

*** Edited***
Thanks for your comment Sam - but I have already put the holes in the buttons.
I did think about a shank but I doubt that I could do that as these are made from polymer clay and I am not sure about how I could have attached a metal one!