Monday, 9 April 2012

Stir crazy rainy day distraction

 I am going stir crazy - and just don't  know what to do with myself.
I can't read, can't do much crafting - as you have read, the wooden ATC took me days, I shouldn't really be on here - but I won't be long.
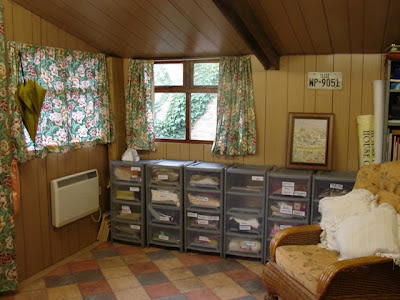
I thought I would distract myself sorting out my garden studio as it's been hammering down with rain all day.

I decamped to a tiny room indoors winter 2010 due to bad weather not much fun trudging up the garden in deep snow - although once inside it's cosy and warm and I have internet connection.

The builders commandeered it during the summer for all their materials whilst we had the garden room added.

Then this past winter we had lots of snow too - so apart from a bit of flower arranging it's been abandoned.
 I got distracted all right - just sitting looking out of the windows at the views - the chooks running around in the rain, and digging for worms and generally having hilarious fun
 I daydreamed of the summer, and the roses outside the window, the flower borders filled with colour
The gooseberries on the side of the garage getting lush and plump.

I opened some big boxes - which I found contained some of my eldest son's wedding photo's in Japan, and sat and daydreamed of their traditional Japanese wedding a temple, and the guests dressed in beautiful kimono's and the gentlemen in smart black suits and white shirts, and white gloves.
Haruko had the most beautiful white kimono and headress for the monk's ceremony and blessing, and my son was dressing in the tradition Japanese style too - looking very handsome.
Then Haruko changed for the wedding reception at a big hotel, and wore a stunning beautiful embroiderd silk kimono and the traditional headress that goes with.  
Then I pulled myself together after quite a while, and had finished looking at several other photo albums, and got tidying again.  Do you get side-tracked?

I did some tidying up - sorting out things to go - then putting them back in drawers 'just in case'
 I bet you can't spot the difference - but there is a lot, including packing up lots of oak floor boards and moving them!
Still - I do have some empty drawers now, and I have decided to move all my polymer clay 'equipment' in here - and maybe some of my stamping and painting, and gluing and inking.........

or not!!!

Well just the polymer clay stuff first, and the sewing machine, and perhaps I'll move my metal stuff and start playing with that in a few weeks time when my eyes are properly sorted and healed.

Best go back indoors - it's time for tea.
 

One eyed crafting

Apologies in advance for the dreadful  photos and any typing errors.

I have been trying to craft with the 'corrected' eye seeing only long distance, and the other eye not being able to see clearly more than a foot!

I ordered some crafty goodies from Happy Daze  the link is in my side bar too.  Amongst them were the set of 'Flapper' stamps and a chunky wooden ATC.  I think that I will enter this for the Happy Daze Challenge here
In real life it does look so much better and I am pleased with my efforts - but  you'll have to take my word on that!

 It's taken me quite a few days to accomplish with blurry vision.
The wooden block is the colour of pine, and it has a lovely grain, so I mainly left it as it was and just added a bit of white ink in the middle to stamp on.
 I used sepia ink for the image and swooshed a bit of water colour pencil around the edges of it.
Of course I had to pick the hardest colour combinations to photograph!  
Trust me!

I used a sepia water colour pencil to add extra colouring and shading to the images.
and a light coating of copper rub and buff to pick up the wood grain.
The idea was to create a faux perfume bottle.

 Crickey these photos are so bad which is such a shame as it looks pretty in real life and more like a bottle with the light catching the copper highlights and the wooden knob on the top shines like solid metal.
I really love this set of stamps and can't wait to see again so that I have really play with them.
It's been ages since I stamped - I really lost enthusiasm for it - but I have got it back now.

8 days until my next operation - and only 9 days until I'll have 20/20 vision in both eyes - yippee.

(But I'll still need reading glasses)


Saturday, 24 March 2012

Flower Arranging

I haven't been on a flower arranging workshop for over  three months and it was wonderful to be able to spend yesterday afternoon in a little village hall half an hour or so from here, in lovely company, playing with flowers.

This month Claudine picked a lazy S style - which is one of the most difficult to do.  We all groaned - including Claudine - but we did have fun.

The arrangement took a bit of a battering on the journey home - but hey ho - I still like it.
 Brenda, our tutor, got the flowers for me from a supermarket, and I love the colours.
For some reason, the camera automatically altered this photo when I saved it!  I had to close the blinds and stand the arrangement on the floor as it is very tall and I couldn't get a proper photo of it on the table.   The sun was streaming in, so I stood it on the floor and drew the blinds - they are white not blue!


Sunday, 11 March 2012

Vintage Robin's Nest Box

I have joined in a Round Robin swap on UK Stampers  this has nothing to do with that though other than the Robin bit.

I want to thank all those who have left me lovely comments and have encouraged me to have a go at stamping again.

My eyesight has been so bad that I gave up - but the good news is that I will be having an operation on one eye at the end of the month so within two - four weeks after that, I should have perfect eyesight in one eye and only need glasses for reading - how cool will that be!  I was also told that I will be amazed at the colours 'in the world' and will need to wear dark glasses for a while to get used to it!

That got me thinking - what on earth has my art work looked like these past few years.  It looks darkish to me and I am always trying to make it bright by adjusting the photos - so goodness knows how it looks to everyone else.

Bare that in mind when you look at these photos.

This box has a dark aged vintage look to me - but if to you it's bright - get out the shades!
I painted this first with a coat of gesso all over.
I coloured it with a lime green, rose pink colour washes.

I painted the egg Robin blue (I know Cath the robins don't have speckles on their eggs but mine did) wink wink. 
Cath's just posted that it's an American robin, and not our more rounded little European Robin - I thought it looked a  bit slim - but thought it was my eyesight!  Well I am sure the American robin will lay blue speckled eggs. He he
Using one of my new stamps, I stamped both of the longer sides and them embossed with black embossing powder to give it some texture.
The shorter ends I repeated the process but with a Japanese nest stamp.  
When the sun shines on the nests, you can see a glint of the gold rub and buff

 I stamped the top with one of my new stamps, and painted it to look like (in my eyes) and old faded collector's card.
When it's in bright light it picks up the patches of destressed rub and buff gold.
I sealed the top with a matt acrylic 'flat' varnish.

With spring on the way, the birds are at their happiest making their nests and laying eggs.

Well - I DID IT!  My vintage Victorian robin's nest box

And I don't know what it looks like to you - but I bet I get a shock in a few weeks time - and won't that be brilliant! 

(And if all goes well I will be able to have an operation on the other eye - now that WILL be like winning the jackpot!)

Saturday, 10 March 2012

Happy Daze are here again......

The brighter days are making me feel better lately and full of the joys of Spring.  I have been spending a lot of time making and taking moulds with polymer clay, which has been fun, and relaxing.  But I have had the urge lately to get back into paper crafting for a while, and having been inspired by the members of the Happy Daze Design Team Blog and also the work lately of Ginger's Welcome to my World Blog and her fabulous work and this latest box she's decorated - it's kind of kick started me into having a go myself.

'You can't take it with you when you go Mum' as my sons keep telling me and urging to spend and just enjoy my old age - I decided to do just that.

A big box of goodies arrived in my porch early today.  My goodness, Moira at Happy Daze gets her orders out quickly.

Want to have a peek?
Having been used to 'feet and inches' for over 60 odd years - I have decided that I must get my head around these cms things.  I'm fine with metres, it's those darn little cms that get me confused!
When my eldest son was little was taught in metric, I asked him 'How long is a centimetre because I can't work it out?'  And  he would reply, 'It's the same size as a two'er in lego mum!' and sigh.  I think that I shall have to perloin a 'two-er' from my grandson's lego box and keep it by my side as a guide!

So, it came as a real shock when Ginger's little Paris Exposition box on her blog, is not a mini little box but is one of those HUGE boxes in the background!  It's so big that it is actually really  very  very useful - well both boxes are fabulous sizes.  

 And Jo Capper Sandon's  lovely wood mounted owl stamp which I absolutely adore, is tiny sitting on the top of the box, when I expected him to be as big as her bumble bee.  But I love him so much, he's actually the perfect size and makes a great addition to my collection of her Stampotique designs.  He really looks grumpy, but he is going to get so much use as I use stamps on all the letters I send out - and I have a serious lack of small stamps.  I have to admit to an addiction to Jo's stamps and they are the most used out of all the stamps I have.   They sit on a shelf right in front of my eyes looking at me,  and I just can't resist taking them down and using them.  There is something very tactile about the wooden stamps - and the old adage 'Out of sight, out of mind', is often the case as my unmounted ones langish is drawers behind me.

So, if in the next few weeks, I haven't started using this latest stash - will you please leave a comment and 'shout' at me to get my finger out!

If it's miserable weather tomorrow, then I might just make a start - if not I have to spend a couple of hours up the allotment.

Have a great weekend everyone.

Monday, 5 March 2012

Making an Egyptian artifact

I have spent the past hour experimenting - trying to turn this

As you will see in the previous post - this is a bright yellow brass charm, with a  hollow back.
I make an impression from the back with polymer clay (having tried the traditional method of covering the front in clay to make a mould - unsuccessfully)
I baked the mould - as in previous post and here is what I have got now
It is a yellow gold in proper outside daylight, but it's looking darker because of the dark light outside.
I didn't want an exact replica of the charm, I wanted mine to look as though it been dug up, knocked about a bit, and aged.

I rubbed it down  with fine wet sandpaper to give it some natural wear and tear.  Then I rubbed black acrylic paint all over it with my fingers and wiped off the surplus.
I used gold rub and buff all over it - and rubbed and buffed it!
Rubbed over some more black acrylic, and repeated the process.
I am pleased with the end result - it looks so much  better in real life - it being gold rather than painted with gold paint.  The raised parts shine and the recessed areas are dull and dark pitted.   

I'll see what it looks like tomorrow and may do a bit more ageing.

This doesn't look like it's polymer clay at all which I am pleased about.  
It's great to experiment.

Making moulds for embellishments

After yesterdays mould taken from a big plaster cast - and as it has been hammering it down with sleet and heavy rain today - I decided to have a go at making more moulds and embellishments. 
 I need to scrub off the cornflour and tidy a couple of them up - but I was quite pleased with my efforts.


Apologises for the photos - I tried to use a daylight lamp and the bulb went!
A long time ago,  I was lucky enough to get some blog candy from Cath at Katy Krunch
They were little brass charms - which I have been sharing with other arty crafty friends.
I have used some here to make moulds from and see how they turn out.  
I love the Egyptian one especially.
I love shells, but find it hard to get them to stick, so I am using some from my collection to make moulds with, and then I'll make some polymer clay shells and see if they stick better.
The military button is one I found in my botton box and the rose button was a 'fancy' one for crafts. It's made a good impression, so hopefully, I'll get some nice flat roses.

The mushroom is from an embellishment I bought which broke before I had even used it! I had a couple of the same make break too, they are stuck on so hard to the card it's virtually impossible to get them off.   So I took a mould from the pieces of the mushrooms, in polymer clay, then pushed the bits back together where they were broken, and made some impressions in to biggest one to turn it into a fairy toadstall.   I  might have a go at making another one and turning it into a toadstall house.

I think I'll start to paint some now.