Tuesday, 14 December 2010

Fabric postcard - with vintage c1920's material

Recently I made a fabric postcard for a swap, my very first, and now that it has arrived at it's destination I can post it on here.
I made it from a sample of vintage French material circa 1920's
which found it's way years ago to a shop in Norway, and was bought by Ati
I couldn't bear to part with the original label - rusty staples and all - so this is a photo copy which I made on old paper - it's hard to tell that it is not the original


It looks like silk brocade with gold embroidery, and I have made it 'shabby chic' style, sewing it on to the back of a scrap of vintage hessian, which I had stamped with vintage script

Then I built up the layers.
Another piece of the vintage blue and gold material

More torn hessian stamped to match the base layer


Then I did an image transfer of this gorgeous girl which really suited the period of the material.
I dyed the scrap of lace to tone in with the colours in the image, and added the tiny circle of from a piece of vintage crocheted doilly.

(I have kept enough of the sample to make myself a similar postcard or wall hanging, or maybe I will make a journal of little works of art using the samples in 2011, the material is just so beautiful)

I received my first ever fabric postcard swap back - from Jean - the start of a lovely collection I hope.

I can see how addictive these little works of fabric art can be!


Monday, 13 December 2010

Upcycling 'rubbish'

Have you got any of these lying around?   Well don't throw them out will you.

Take out the pattern

Add some stitching.
Slap on some gesso - as much or as little as you like.
Then you can cut it and sew it up as it is or.....

I decided to cover mine

Added some scraps of webbing

Added some handles

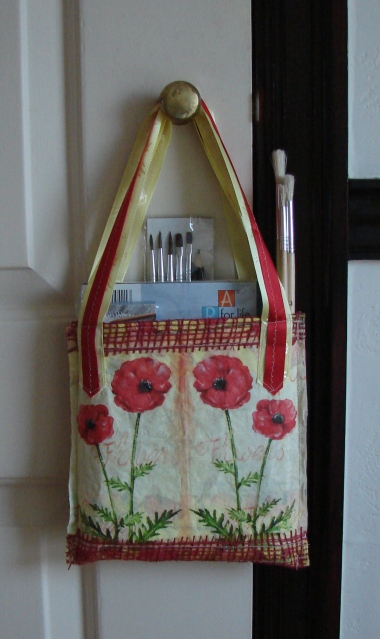
Hey presto - a bag.
It's surprisingly strong!
This one holds an A5 journal set with coloured pencils,
and sets of brushes.

If you would like to have a go at making some lovely bags out of paper - visit Roben-Marie's blog here - for lots of inspiration and a free mini workshop with all the instructions here

Mine is rubbish in comparison with her samples - but after visiting her blog late at night on Saturday, I just had to go into my craft room right away and have a go at one!

So in essence this was just a practice piece to see if I could make one - my head is now buzzing with lots of ideas on adapting the process to make all sorts of packages.

Sunday, 12 December 2010

Another week - another 'cake'

I made a square arrangement for a friend.

Another cake design

I hadn't seen this friend for over 20 years


She thinks it is about 23 years

 
What a joyous weekend we had - and we won't lose touch again
I was able to use lots of foliage from my garden, and moss just a couple of days before the snow wrecked most things

I chose flowers that should last a long time

I love Christmas - it's such a great time to flower arrange


I am working on a Christmas cracker

 
I'll finish it over the weekend - it's very Christmassy

Saturday, 20 November 2010

Zero calories, fat free birthday cake.

My daughter in law Haruko, is 40 years old today.  I didn't have 40 candles so improvised with the cake.
I glued two blocks of floral foam together, then cut out a circle.
There are lots of layers.  Dozens of laurel leaves 
Each picked to be of a uniform size.  Secured underneath and then each one pinned to overlap the previous one.

It takes a long time, and a lot of patience - but it stops you eating!

You only need tips of shrubs from the garden and moss to fill the gaps.

And in true Alice in Wonderland fashion with the flowers

Off with their heads!  The flowers last so much longer this way

I think  it looks good enough to eat - and smells divine!
The chunky candle should last at least a week of night time lighting.

I think I will make a few Christmas cakes like this!

(Oh - before I forget - I have baked a really BIG calorific wicked chocolate cake too!)


Friday, 19 November 2010

It's in the post - work in progress, and Mary Mary

The wall hanging is finished and in the post.

The next experiment

I spent some time over the last few nights just experimenting with layers.
Trust me this looks better in real life, the colours aren't so harsh, and it has a feel of the Tudor rich velvet costumes and wall hangings - muted, but rich
I thought you might like to see how the layers are built up.


It started off as a piece of cream material, which I painted with suede acrylic.
Cream was stencilled on next.
Then pearlescent white.
Metallic green.
Brayered white all over.
Stencilled gold.
I now have one more layer of acrylic white to brayer on then I'll build up the layers of material.


This is Mary - she somehow managed to get on the wrong blog.
She's a very very rare little Lemon Millefleur Sablepoot.

She decided to sit right outside the conservatory window on a wall - to dry off her dirty 'boots'.
I think that she is as pretty as a picture - so I'll let her stay here!

I spent a lovely couple of hours at a flower arranging workshop this afternoon. 
It was too dark to take a decent photo of the finished work - so I'll post that on here tomorrow.


Tuesday, 16 November 2010

'Make an item of your choice using stencils'

I thought I would have a go at this swap - it's taken me quite a long time to do this - but its been fun.
I had bought a yard of this from a charity shop - it's quite thick material

I had to do this in stages.  Firstly I painted the metallic copper layer over a stencil and left it to dry overnight.

Then I painted the pearlescent on top through another stencil - left that to dry overnight and repeated the two processes the next couple of days.  (Having been doing Tam's free course, I have learned a lot about layering - it really makes a huge difference.)

I cut out a heart from the same material, then painted the pearlescent over stencils - yes you guessed it, left it overnight to dry.  I painted around the edge of the frayed heart, transferred an image directly onto the heart, stamped 'Best Friend' with Stazon, and then sewed all the layers together.


Hemmed the top, sewed on the vintage lace borders.  I haven't decided whether to just sew on the cord or to thread through a stick and tie the cord on. I'll experiment before I send it off.

This photo is just to show you the difference it makes taking a picture at night with just the room light!
The other photos were taken under a 'daylight' bulb lamp.

Sunday, 14 November 2010

Art, Heart, and Healing Course - Week 3 Part 2 - The making of an Empathy Monster

You'll have to click the link to Tam's free course to see what all this is about - yet another new technique and learning curve.

This proved rather difficult for me - a monster!!!!

So this is a prototype using the drawing Tam gave us.   There are elements missing - like a zip for the mouth, but as they don't say anything - my little 'Emy' Empathy doesn't have a mouth.
She is made from scraps - second hand used blue velvet - feels oh so soft on my cheek.  Ribbon someone saved for me a year ago - from a box if chocolates.  Fringing from a charity shop, buttons from Freecycle, and the star is shell which I coloured blue.  The heart from a piece of silk from a charity shop tatty scarf.

Now that I have made Emy, I want to make some friends for her - just need to get some 'bits' to make them 'properly'

Oh - and she is filled with perfumed stuffing!

Obvously NOT  a child's toy!

Edit
Thank you for all your lovely comments.  I can't wait to make some more - this is my first ever 'doll' - I'm a bit old to finally have one, better late than never!