Sunday, 8 July 2012

Gotta pick a poppy or two

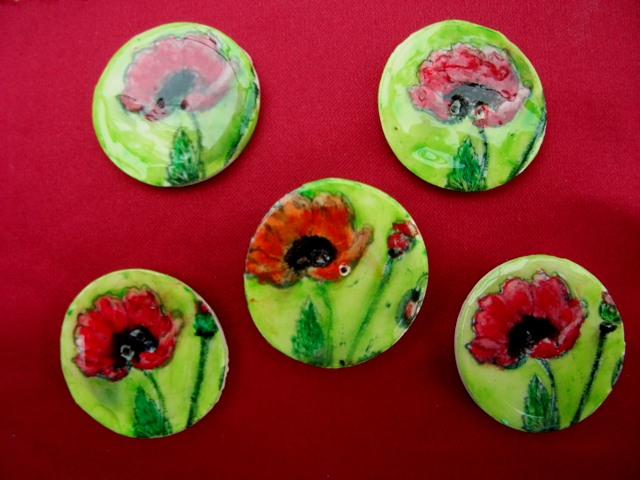
Well I have managed to make five poppy buttons - and I'll be using four for the swap  - just the red ones, although I do like the orange poppy in the middle - but it's a lot thicker button than the rest.  I tried to paint a Meconopsis blue poppy - but it just didn't look right so that hit the bin!

These look better in real life than in the photo - silly me took it in the garden room which has a glass roof so they lighter in the photos than they really are.
I was quite pleased with the glazing - and even more pleased that I left them alone and didn't mess them up!

It's a shame that I have to sew them onto a tag as it'll mess up a part of the poppy - darn it - I wish I had thought of that before.

Looks like I might have to start all over again!

Next is the hardest part for me - trying to make the tag that they have to be mounted on.

*** Edited***
Thanks for your comment Sam - but I have already put the holes in the buttons.
I did think about a shank but I doubt that I could do that as these are made from polymer clay and I am not sure about how I could have attached a metal one!

Friday, 6 July 2012

Painted and inked Polymer clay fish

Well I managed to finish a couple of fish today - although I am not sure what I will do with them.  I need to make 5 charms for a swap - so I might use one of them towards the five.
 They took a long time to paint and I had to leave them for hours and do them in stages
They are looking pale in the photograph.
In reality they are shades of silver, blue, and salmon - all metallic colours blended to show up the scales - and some 'dirty' brown mix of acrylic paint to add a bit of depth and interest to the segments.

Polymer clay button

I have entered a 'button' swap which has to be in by the end of July - which is good because I need time to practice.

There was a link on how to make buttons using paper and card - basically you cut out lots of circles and glue them together in a stack.  It would take me too long to do that as I don't have a circle punch so I decided to have a go with polymer clay.

I  have cut out and baked a dozen or so, so I should be able to make the minimum  3 required shouldn't I? 

As it's raining today - in biblical amounts - I have taken the opportunity to practice painting some.  You would think that it would be easy doing a little button wouldn't you - but with my big bent fingers I now realise that it's not as easy as I thought.

This is the first one at the just painted stage.
This is a Big enlargement - the actual size is the size of a 10p piece!
It'll take ages to dry before I can varnish it - but I am determined to not touch it until tomorrow or I am bound to mess it up!
The 'red' edging on the right of the button is a reflection from the material.  I need to do the edges when the top and back are totally dry!

Monday, 2 July 2012

Polymerclay Playtime

 We had heavy rain today - so I was forced to stay indoors, so I decided that it was about time I got back into crafting.  So what better way to start than going back to one's childhood and just messing about - not with plasticine, but with something very similar - Polymer Clay.
All these pieces are straight out of the oven - so are in their 'naked' state. They'll need to be sandpapered several times to start with.  The above beads are tiny lentil beads, and will look so much better when polished.
 As I am a beginner, this is all experimental to me - so lots of learning curves.
 I'm messing about with textures at the moment.........
 and these are all destined to be painted, or coloured, or inked, or maybe gilded - all experimental
 Every piece is unique, it's impossible for me to make two the same.
Sadly I have managed to break the tail off one of these fish - I rubbed too hard with the sandpaper - so gave up doing anything more to any of these pieces until tonight as I am tired.
 Those with holes will be for pendants or bracelets, or key rings.
 I was quite pleased with how these bigger white fish turned out,
in real life they look ivory coloured - but I want to make them look vintage - Chinese perhaps?
So, I'll be doing some research to see if I can find out how to do that.

I am showing you these in their 'raw' state - just to prove that you can't really make something and bake it and expect it to look perfect - like all clay-like projects, there is quite a bit of work involved to make them look better.  And I have no idea how many of these will survive my clumsy attempts!

Oh, I nearly forgot - I have being messing around trying to make buttons and discs.  More texture - these will be practice peices as far as colouring goes.  The backs are textured too.

TTFN

I'm back thanks to the 'little pleasures' in my life......

My son and daughter in law and little grandson came at the weekend.  
We went out for a nice Sunday lunch - then it was play time.
It took me/us so long to get this simple looking structure to stay in place - about half an hour!  It all just balances on each piece!   When it was finished, little one had fun rolling the marbles down it - for all of ten mintues - then kept knocking it over - much more fun.
Horrible 'posing' photos - he's at that age, and was getting bored!
This sort is far much better - catching him unawares.
After we (he) had reached the boredom threshold, it was time to change tact.
The oldies were dozing off their Sunday lunch, and I was in charge of entertainment - so something calming was called for.
Polymer clay - a few bright colours and a rolling in, and a little one's imagination.
I never got time to photograph the finished pieces - I'll have to email his mum to ask her to do so for me.  But this turned out to be a lion's head - and he also made a little mouse - all baked and taken home.

A couple of weekends ago, my husband's eldest  son came with his three children which we haven't seen for a while - and we took them all out for lunch too.  They are 18, 15, and 11.

The two oldest were absorbed in their Ipads and state of the art phones, but the youngest was really keen to make something - as we all used to do. 

So off we went to the studio again for her to have a play.  We all used to spend hours out there when they were younger - giving the 'oldies' some peace and quiet to chat.

I hadn't started playing with jewellery when she was last here - so asked if she would like to learn how to do something - which she did.

I gave her free reign of my beads etc and she made this little bracelet.  
Using my three only glass star beads that change colour  and are so beautiful, she decided to make a bracelet and luckily I had a selection of beads to compliment the stars.  The only thing she didn't do were the metal clasps - even I found that difficult.
It looks absolutely beautiful in 'real life' and natural light.
She also wanted to make a card - for her mother - so spent a happy hour going through all the stamps and craft supplies and she chose the stamps she wanted, and made a lovely card - alas I didn't get time to take a photo of that.

We haven't heard from them since - but I assume that her mum liked the card she made and I hope that 'K' treasures her bracelet.

Having played with my grandson and watching the fun he had with polymer clay,  gave me the enthusiam to take time to play myself.  I'm getting to feel like my 'normal' self again too - and have signed up for a couple of 'swaps' which I know that I can do in the allotted time - so I am off to play with clay for myself in the garden studio - I hope to be some time!
Wednesday, 20 June 2012


 I've done a little bit of flower arranging - a design for my garden room.
 Inspired by an ornamental cage using bear grass, garden foliage and bought flowers.
 There were some flowers left over.....
So with different garden foliage I created different designs.
I had forgotten how much I enjoyed messing around with a few flowers.
I mustn't leave it so long again!


Happy Birthday Mum

Friday, 13 April 2012

Messing about making moulds

 Its raining again, so after the usual morning chores 'sigh' off I went out to the end of the garden.
I thought I would experiment making impressions of 'things' and see how they work out when 'caste' with polymer clay.  

The above which I used polymer clay to make the impression - turned out quite well I thought.
 I wanted them to look like 'found' objects rather than works of art
 So they don't have to be perfect, and I have 'messed them up' a bit
 It's great to experiment with supplies that are so inexpensive that it doesn't matter if they get messed up.
These two are just fragments of the impression I took of

 A roman relic I made here

I made a few more then they all got baked for half a hour - and I sat looking out the window at the torrential rain!
Here are some of the baked examples
 A mushroom
It was fun getting three different face projects from the one mould just by experimenting, and playing with a moulding tool.
These are for an 'Roman' theme project.

So that kept me busy for a few happy hours - it's great to just 'play' and experiment - you never know what you might come up with.

Next I will try to colour the faces etc - but need to wait until I get my 'new eye' !

Thanks for visiting