Friday, 28 November 2008

Another sort of art - Flower Arranging

I spent a pleasant couple of hours this afternoon in a village hall flower arranging.
The theme this time was Christmas - and there were all different shapes and styles of arrangements being made.

We just had to do whatever we wanted - but had to bring a in picture or photo of the design we were going for.


The spikes of yellow flowers are Mahonia, and the foliage you can see is bay, rosemary, Australian bottle brush sprayed gold and some hypericum berries. You can click on any photo for a close up


Yellow cymbidium orchids and red spray carnations.
This will reside in my porch on the window ledge where it will keep nice and cool and will last right up to to and over the Christmas holidays.

You can also see conifer, variegated holly from my garden and fir cones sprayed gold.


Its a bit early for Christmas decorations for me - but this, I feel, is not a traditional arrangement.

When the flowers fade I can remove them and the ribbon, and by adding a few flowers, it will last through spring.


And the cost? Not as much as you may think.

Stem of Orchids £4.95
Spray carnations £2.50
Foliage from my garden and hedgerow

The ribbon I already had - so too the candle which is years old.

And the best bit is - I have enough of the above flowers to make either one more large arrangement like this - or two smaller ones for either side!

The porch smells amazing when you walk in there with all that foliage.

Sunday, 23 November 2008

Something completely different!

This Thursdays Challenge is 'Playing with Paint'


This is something completely different for me! If you click the photo you can see the embossing texture.

Colour washed background paper.

Then I used my just arrived Tim Holtz masks - aren't they BIG! I don't do big - and when I saw them I thought - I won't be using them! But encouraged by my very talented friend Paula and being snowed in - I thought I would give them a go!

I placed a tiny part of the mask onto the paper and then applied more paints in different colours.


With a white pen and using the bandanna method, (it was my first attempt) I dotted around the masked areas. Then embossed the areas which were outside the mask.

It's given the book cover a lovely texture on the dark areas which emphasise the masked area.

I assembled the notebook with my BIA and added an acetate cover - to finish it off.

Friday, 21 November 2008

UK Stampers Challenge

The challenge on UK Stampers is to make a piece of art using an old stamp which you have not used before.


The photo stamp I used on this note book I made, was one I bought second hand on impulse.

I had to take the photo in artificial light unfortunately - which does not show it to its best advantage.

I stamped the vintage image with sepia archival ink, then embossed it - the spots you see are not spots on the image but where the light is catching the embossing.

I then 'inked' all over the cover, and embossed it with gold to give it a vintage 'leather' look about it - well that was the aim and added a gold strip of ribbon.

In 'real life' it looks so much better - clear embossed in the middle with a clear photo stamped image - and the textured gold page.

Sunday, 16 November 2008

Blog Candy

Angel Drummer is celebrating her birthday with a blog cand giveaway! Happy birthday

Thursday, 13 November 2008

Shades of the sea - 'Friend' tag.


I can't get a true to life picture of this, couldn't take it in daylight - so this is a scan.

I have shaded it from left to right with sea green, blue, then sea blue - then stamped it and added the wording.


The wording cut outs are not are showing up quite white - think its the scan light and flash light, in reality they are shaded with sea green and blue to match the tag.

Tuesday, 11 November 2008

Matchbox project - Blending Foam Storage Box

Remove all the matches from the boxes and store in a sealed tin for safety.
Glue your boxes together - Use any multiples you like. I decided on 16 boxes.


Cut a strip of paper to cover the top and sides and overlap at the bottom about 1/4 inch. I decided to decorate my strip but you can use pre-printed paper of course.
For a stack of boxes this size my strip was the length of an A4 sheet cut 2" wide - which made it easy! You need to cut a strip to go across the bottom too (on top of the overlap from the longer strip.)


Next I glued the strip and covered the box overlapping at the bottom, then glued a piece to cover the bottom


Once inked and stamped I decided it looked a bit pale - so added another layer of ink
and over stamped it.


And then one more! As I am a mucky worker and often have ink on my fingers I painted the top with Shellac to protect the surface.


Then all I have to do now is to ink the little drawers as I go - with a blending foam pad then pop them into the appropriate box.

The match boxes push out from either end with your finger or you can add a little brad.


On the reverse of each box I put the make and colour of the ink I have used on the pad.

BIA Note Book - Vintage Gold


I did another little notebook - today - again just experimenting and it fits the challenge on This Thursday which is Marvelous Mettalics.

I used a piece of scrap paper I had - which was pale blue to start with. Dabbed on a bit of colour here and there, then stamped it, and embossed in black the 'lady'.

Swished over some gold and then heated up the embossing again so that it came through the gold.

Stamped and embossed the patterns at the top, then with a complimentary chalk blue/green, I stamped and embossed a little trio of leave stamp which came with my prize Trees Stamps from Stamping up Stamps around the page to create a vintage look wall paper effect.

This positively shimmers in daylight sunshine.

Elaine is having a birthday giveaway

Elaine is generously giving away some blog candy to celebrate her 40th birthday.

Her blog is so inspiring - take a look HERE

Monday, 10 November 2008

BIA Note Books

I have been experimenting and making a few note books.


Some photos make the books look a bit 'wonky' - its where I had them standing up like tents - they are fine in real life. The one above is embossed with gold.


This one has been stamped then heavily embossed with clear powder. It has a lovely effect in 'real life' and looks very textured.


This one has been stamped and painted - took quite a while - and the colours are more subtle in natural light.


This last one has been stamped and embossed too - and it is hard to see but I have outlined the book edges too and embossed those - again for a nice texture which makes the image 'jump' off the paper

Sunday, 9 November 2008

Tree Stamps Prize - From Time for Crafting

I subscribed to the online Time for Crafting magazine and entered a competition and won a set of Tree stamps.

I was so excited - they are wonderful stamps - I just couldn't wait to try them out.

Here is the first thing I have made with them - so far!


The far skyline and tree line I have made misty purposely - so it looks like an autumnal misty sunrise. (which you can't see in the photo) I achieved it by swiping some white chalk over the layered colours.

I drew some birds - some of which got caught in the wire silly me - I should have punched the holes first!

There is clear embossing to give it texture and in the foreground I have stamped a clear embossed tree.

Inside there is another image I stamped and painted with inks. The stamp is from the Goddess plate I have used quite a bit lately.


Her face is flesh coloured but doesn't show up in the photo.

The background painting is a dark shade of brown at the bottom gradually fading into a watery pale hue ar the top - and all with green tints just washed over to give a nice autumnal soft effect. For some reason it looks grey and blotchy in the photo!

Think I might make some more of these.

Saturday, 8 November 2008

Bamboo tiles/Dominoes

On the One Powerful Hourthe challenge is to make a Christmas ornament in one hour.


So take your pick - these took an hour each to make - over several days though.


This is the reverse of the bamboo tile below. I can see a left side of a face in my marble-ing - can you? I can see half her face peeking out from a door - an eye, tip of her nose and half a mouth - and the has an old fashioned hair style - long and wavy right down to her shoulder.

Oh - now on the right hand side of her, I can see a young child (boy?)with hands in the pockets of a long white coat that reaches down to the floor - over dark clothes.

His head is tilted downwards as though he is looking at the floor,and he/she has a floppy fringe, or it might be a hat. To the right is a white wall like the side on the house and he/she is walking on a white pavement. LOL Or is it a man in a white coat coming to take me away!

Its a pure fluke

Does that ever happen to you - seeing faces etc in clouds or flames or wallpaper?


Each little tile has at least three layers of varnish - some have five coats.
This little lady I have made into a mobile phone charm.


Each coat of varnish takes 24 hours, at least, to dry.


And I can only do one side at a time obviously.


Although some images appear on more than one tile - every single one is different. I put gold or pewter leaf on them, beads or charms, to make them all individual.

They are such a joy to alter - and patience is needed - in bucket loads.


I have been experimenting as you can see - and not all of them are Christmas themed - and not all of them are finished yet - so come back soon and see how they all turn out.

View from my studio window soon after 6am today

I was in my studio early this morning putting another coat of varnish on the bamboo tiles.

When I looked up I saw this


I ran indoors for my camera.


It looked even better in 'real life'


In a few minutes when the sun rose - it was gone


I am so glad I didn't miss this


Isn't it wondrous? It made me feel so happy - and was such a wonderful experience.

There was total silence - the birds were just waking up - and as soon as the sun was up they started singing - I felt like singing myself.

By 9am it was dull and grey and raining.

Friday, 7 November 2008

Craft Stamper - The winner is my friend Paula


A very talented friend of mine Paula Whittaker of Cardcraft Creations is the winner in this month's Readers Gallery.

Well done Paula - I am chuffed to bits for you - and it is very very well deserved.

Thursday, 6 November 2008

Works in progress - Bamboo Tiles/Dominoes

I haven't been able to do a single bit of crafting today - but I have not been idle - I have been working on these for a few days on and off. Still a long way to go yet until they are finished.

I have some lovely images on CD - Vintage of course - so I just had to use them - but trying to resize one by one was a nightmare!

You would have laughed if you had seen my final attempt - cutting and pasting them into word, then reducing them and measuring them on the screen with a ruler - so time consuming!

The Christmas ones I am going to turn into tree decorations I think


Here are some works in progress - which have had to be left for 24 hours after their last coat of Shellac. I still have the reverse sides to do.


Sorry that the photos are a bit rubbish - its the glare from the foiling - should have waited until daylight.

I will remember to take them in sunshine - if we get any - when they are finished with all their dangly bits.


Some people call them tiles sometimes people advertise them as bamboo dominoes - but whatever you call them - they are adorable little bits of wood to alter.

Monday, 3 November 2008

Bamboo Domino Tile - Green Japanese Lady - This Thursday Challenge

The following tiles I am entering for
This Thursday Challenge

These are my first 'efforts' so took me a while to do as it was by trial and error but making them certainly kick started my Mojo again.


This lady has taken me so many hours to make over three days that I think I will keep her and have her as a pendant.

I used Shellac - then a thick coating of diamond glaze and she looks like the is made of glass.

There are not any lumps and bumps - its just the reflection of the flashlight.


On the reverse I used Shellac then Crackle Glaze - I like the finish


I am just waiting on a new batch to arrive - then I have so many new ideas - so watch this space.

Bamboo Domino Tile - Roaring 20's


This one is a 'distressed' roaring 20's style - with gold leafing and five coats of Shellac.


This is the reverse of the pendant treated the same way as the front.

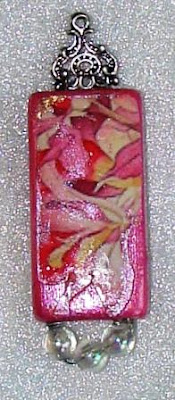
Bamboo Domino - Pink Lady

You saw this dangling in a jam pot yesterday evening - and here it is finished at last.


I painted the domino with two coats of Lumiere paint to match the images. When dry I glued them onto the domino - doing one side at a time. At gave it a couple of coats of Shellac to seal and waterproof it.


I used the same process for the front using a vintage image.

Then I chose some beads, which although look transparent here, they have tints of pink mother of pearl when the light catches them.

The silver topper (for want of a better word) was rather a challenge to put on. It is firmly attached through the domino with wires and those have been superglued into the holes make it rigid. I just need to add a silver ring to it - then decide what use to put it too.

I finished it off with a further three coats of Shellac - to creat a lovely glossy but soft look.

Bamboo Domino


Well this one has had its last coat of shellac - on the back of the tile


And on the front. I took these in daylight so they look better than the photos I did yesterday.

I am still working on three more!

And have ordered lots more!

Sunday, 2 November 2008

Domino Tiles - work in progress.

I have had these wooden domino type tiles for a while now - so thought it was about time I did something with them.

I thought it would be quite simple to alcohol ink them and then stamp them - which I did with a few.

But

I found that the alcohol ink sunk into the wood and looked rather pale, and the pigment ink I used for stamping refused to dry - then overnight it had almost dried - and after another night it also seemed to have sunk into the wood leaving a blurred looking print.

BUT I have ordered lots more and have lots of ideas - so I will master the inking and stamping and other techniques on them I am sure - watch this space.


Or is it the case of a bad workman blaming the tools.


Starting afresh with more tiles, I tried painting the surface with silver acrylic paint - which showed up the grain which I thought was quite nice.


I added an image then gave it a coat of shellac and left it to dry overnight.

The next day I added metal leafing - which was a rather sticky job. This metal is not showing up too good in the photo. I gave it another coat of shellac and left it overnight.


Today I did the reverse side. More shellac and then the leaf of metal. Then brushed over with a soft brush.


In natural light the leaf metal I have used both sides is the colour of pewter but with a rainbow of shades that changes in the light. A bit like when you look into a puddle and it has some oil on it and you see those rainbow reflections.


Once brushed it removes pieces at random - revealing the dark silver beneath. My aim was to give it an aged look. I threaded wire through it - and transparent bead which marries with the reflective colours of the metal leaf work.


I was trying to give it a distresed look - of finding a relic from a bygone era.

I have given it another coat of shellac each side and it now hangs - yet again for another 24 hours with others below.


Works in progress.........................

They could be pendants, bag charms, key rings, mobile phone charms. The one featured here might have the recipient's initial on the back - lots of possibilities - for my work in progress.