Polymer Clay - starting at the beginning!
I just want to dive in and produce brilliant things - but it's not working out that way!
I have some books, I have some clays, I have a pasta machine, I have the oven, but I still seem to be lacking in tools - which I found out when I started! So I have been ordering the other bits and pieces that are necessary.
I have taught myself the very basics, but it's all going so slowly! The clay needs quite a bit of 'conditioning' done that - there are lots of different clays for different things - I know that now!
These are called bicone beads!
The hole looks huge - it isn't it's the size of a pin pushed through - these beads are small. To make them you mix your clay strips together, make a small ball, lay it on the work surface, place a piece of perspex on top and roll it around - and it ends up looking like a little flying saucer!
This one hasn't been sanded yet! When it has the lip around the hole will disappear.
More experiments....
This time using air dry black clay. Which means it doesn't need baking.
What it didn't say on the packet was how long it takes to dry - so I have done these all wrong!
I rolled it out to condition it - it's very sticky so not as easy to work with. I left the pieces overnight before colouring them in gold, and silver rub and buff and leaving that to dry, before rubbing them.
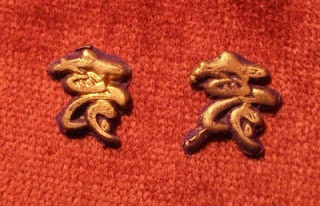
These items are meant to be faux historic finds - I know, but I'm only playing with these!
Little Japanese faux metal calligraphy (but I have just noticed that I need to cut off the extra 'leg' on the piece on the right - doh!)

This is a work in progress. I stamped on some black air dry clay and used rub and buff again, and added the lovely inchie which I have had for a few years now which I received from Hilda in a swap. I need to fill in the grooves with something - maybe beads or something - and add another layer of R&B.
So the things I did wrong was because I didn't find out about it until I had seen a post on a forum:- The black air dry clay about takes 'a few days' to dry. You have to keep turning it so that it dries all the way through as it has a high moisture content - and you must NOT paint it or anything until after a few days. Oh well - at least I know what not to do now!


