Friday 27 July 2012

What a treasure I dug up

 I was up my allotment yesterday evening when the sun was at last going down (dressed as you can see in my Worzel Gummidge outfit thanks husband for the candid camera photo - not!)
I was watering some of my pumpkins and squash
 .....doing a bit of weeding, and planting stuff  and.....
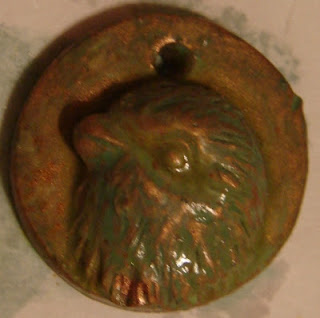
Look what I dug up
This is after it had been washed and some of the rust brushed off.
 I've dug up flints and bits of glass and the odd rusty lump of metal ....
but never an old artifact.

I have taken a mould of her so that I can make others

What era do you think she comes from?
She's about 2 inches long.
I don't have a clue what to use her for do  you?

Monday 23 July 2012

In the post


They are all bagged and ready for posting now. 

I've had great fun creating these, and can't wait to try other experiments

Sunday 22 July 2012

(Almost )Finished charms

Well I spent the afternoon yesterday finishing off the charms.  I managed to break the top of the 'iron' leaf when inserting the jump ring - that's the third time I've done that!  I'll glue it together methinks and mount it on something - as I really like how it feels in real life!

Here's the side views of the charms showing the patina
 I have to confess that as a first effort I am quite pleased with the results
The look more metallic than I expected
And although the whole process was quite lengthy, I have learnt a lot of what not to do, and what's best to do.

Now I just have to add rings and pack them.

Saturday 21 July 2012

Verday painting - 2nd stage

Well I never thought that I would have the patience to wait for 48 hours - and I didn't, so after 36 hours the charms looked like this.
The top left one I had given a bit of a rubbing earlier.

I dropped the charms into a jar of cold water to get rid of the excess patina.

I was quite pleased with how the above turned out  after buffing - it looks much better in real life - like an old found oriental tablet.  To wear it as a pendant I'll need to add a backing or a bezel.

 I gave this one another buff and it shined up better.
 I was really surprised at how the iron pieces changed after the treatment.
 The patina has changed them into a truely rough feeling iron
 This one makes me laugh every time I look at it.
First glance it looks like a warrior out of Planet of  Apes
Or maybe a profile of a dog's head with a funny hat on.
But what it actually is, is an Egyptian find.  You can see the plaited hair on the right hand side, the snake head dress, and the head is turned to the right in the photo, leaning on his/her shoulder.  I don't have a clue why its gone shiney in places, and only rusty around the head - but I love the look
This is one of the teeny weeney bird charms - wish I had made them bigger as they were a job for me to do
 This looks really lovely in real life - a lot richer in colour and very shiney on the metal bits
 The other tiny one - not identical if you look closely.
 A few leaves I made the other day.
 This one was a potential disaster which I managed to rescue.
I rubbed the centre a bit too hard as it was difficult to do - again it's only small about 10p in size.
I managed to rub off the metal paint on the centre piece and it looked like ivory - which was nice - but didn't suit the plaque it's on.  I used some silver on it which has really improved it and I think tomorrow I will flood the centre piece with varnish or something which should really make it pop!

'Just' got to add the rings to turn them into charms or pendants now!

So I'll do those tomorrow afternoon and show the finished objects - then you can decide it they are good enough to enter into the swap.


Friday 20 July 2012

We're all going on a summer holiday challenge on Happy Daze

I am entering this little chick charm into the 'We're all going on a summer holiday'  challenge at Happy Daze  from where I bought the Verday paints and patina from (amongst other things.)
 
 The little chick is just about the size of a 20p coin
 He started his life as a dollop of white polymer clay
 And yesterday he got painted with Verday Iron metal paint (see previous posts) and a coating of Patina at 10.45pm last night.   He shouldn't have been touched for 48 hours but as he was impatient and wanted to be the first to leave the 'nest' of chicks and go off to enjoy his summer holiday, I decided to clean him up and give him a polish to make him look his best
 I have fallen in love with this tiny little chap, and am looking forward to seeing how his little brothers and sisters turn out - before they fly off at the end of the month, around the country for a summer charm swap

Charms after soaking overnight

Well what a difference a night makes - and what a variety of results!

I am really rather puzzled by the look of them so far!
The iron ones (black leaf, egyptian lady head, and bird head bottom row)  didn't look any different last night - but they are looking rusty now, and the egyptian snake headed lady is really now showing up.  The patina on the other metals is really showing up.   It's a bit scary.  There are 38 hours to go yet, and I haven't a clue what they will look like.  I really want all the raised textures to be shiny and recesses to be patina.   Yikes, I think I best make some more charms to be on the safe side or I'll run out of time!

Thursday 19 July 2012

I couldn't help myself.......

 I'm not going to write many words as it so late!
I would not have been able to sleep if I hadn't given the charms another coat of paint, then added the patina.  So despite the late hour I just had to do it!  So at 10.45pm this is what they looked like!
 Then as per instructions - whilst it was still wet
 I brushed on the patina
 I think that I was a bit heavy handed with that
 So it will be interesting to see what they look like, and its a learning curve!
 You have to leave it for 48 hours.
If they look any different to the above tomorrow lumch time I'll post some more pictures.

I didn't waste any time with Verday

I just couldn't contain myself having opened the parcel!
Why wait until tonight?
This was the first three I painted - but of course they get more coats of paint.

It took me by surprise as for some reason I was expecting the paint to be thick but they were runny which is a good thing as you don't lose the fine detail.
These were the next three - so a better job - and you can begin to see the head is Egyptian on the right
This covered the white rather well.

 This covered well, when I painted it on I did it really thickly - but there are a couple of air bubbles which I had to pop.

Please remember that all these pictures are far bigger than the items themselves, as you can see in a couple of posts previously

 So any little imperfections are magnified!
 These were the last two I painted and have turned out the best so far.
They'll all get at least one more coat or maybe two if they need it - then the patina.

It's fun experimenting.

Looking back at the previous post you can see the vast improvement on the 'naked' ones

Happy Daze are here again.................

Oh you are far to young to know that song - and now it's been stuck in my brain since the post lady arrived with my order from Moira at Happy Daze

 I have been lusting after these for a long long time - but couldn't really justify splurging out on them.
Just looking at the 'stuff' in my craft room drawers that have never seen daylight always fills me with guilt.  Am I just jumping on the fever of the latest 'must have' - like the grunge paper and stuff, or the sheets of unused 12" x 12" filling a drawer to the brim.  

Or those stamps - still lying unused in their unopened packets.  To name just a few things1
But I really really will use these, I promise.

I'll  be experimenting on the polymer clay charms to start with - so watch this space.

And talking of charms, whilst online at the Happy Daze Shop.......

Somehow a pile of charms just happened to slip into my basket.

I'll be unashamedly taking moulds of some of them before using the orignals in art.

Do please, I beg of you, nag me, and nag me if they don't start making an appearance on my blog in he next couple of weeks.

Um..... just spotted a problem.........can anyone point me in the right direction to get seme chains and findings to match the antique charms I have bought please?

Wednesday 18 July 2012

I'm Charming.........

Well practising at the moment.  I've been so busy with 'appointments'  and urgent gardening work, since I did the poppy tag that I haven't had time to play.

The thunder and lightening going on as I type this is getting a bit scarey - it's gone pitch black and Mr Lottie is out playing lawn bowls - gulp!  (Well he was when I first started typing this - and it's still thundering and now gone 10 pm.)

Anyway, this afternoon I managed to lock myself away in my studio with the leaking roof at the end of the garden and started practising.

(You can click on photos to enlarge) 

I do stress these are my practice pieces. 
They've been baked, but need to be sanded down, polished, and then I'll be making them look like real charms using different techniques.  They will change colour completely so take no notice of the shocking blue back discs etc
 I've joined in another swap so I have to get these done by the end of the month.

 The charms have to be a size that can be worn as a pendant
Or small enough to fit on a charm bracelet.
 You can see how tiny these are can't you.
I am hoping that at least a couple of these will be good enough, once they are finished, to send off.  But I am not expecting too much - and I have beads I can make charms with as a back up