Well these are the stamps I was talking about in my previous post. Clear stamps, which I didn't really mean to buy - and then wondered why I did.
I have been practicing colouring with inks, layering with inks, and generally just playing around.
I got better as the afternoon wore on! These are little tags which will go out with swaps etc. I might not have the holes in exactly the right places - but I need more practice.
These are more colourful in real life - not sure why they look a bit wishy washy
I liked the colours I managed on this one - and it is on very textured thick card - think I might have messed it up with the dark medallion flowers on the bottom - but again, I was trying out all these different stamps.
The colours on this one are much nicer in real life and they blend from dark to pale.
The sentiment stamp is the only rubber one I used and is from CHF and the bird is a free one which came with my magazine. This is the first time I have used it - and I rather like it - but horror of horrors - it tore in half when I gently peeled it off the acrylic block. None of the others did - and they were all clear and just stuck themselves to the block as this did. It is such a shame as I really like this little bird once I had seen it stamped. I have never had that happen before !
I had fun inking this one - over white red lined paper. The lovely butterfly image came for a Crafty Individuals book - its really nice.
Last one of the day - again this is richer and deeper colours in real life.
Didn't I get a lot done!
Off to put my bantams away as it looks like rain - and to tidy up my studio. I do like everything put back in its place so that I can start a new day with a clear-ish table.
Friday, 31 July 2009
Night Owl
I am not usually a 'night owl' but couldn't resist this one.
You know how it is - you go to an online site to buy one thing in particular, then when you get to checkout it says - if you spend x more you get free postage. So I end up getting little 'x's and then wonder what I am going to make with them
So today I am looking through my drawer of 'extra' stamps - which took me over the free postage threshold and trying to ease my guilty conscience by using them.
I love the latest grungy looking Tim Holtz sentiments stamps, so used one of those, with the owl, and created a night scene by using a CB embossing plate, colouring it, then flattening it - to create the shadowy leaves, then embossing it again to create the raised leaves.
It's just a bit of fun - not a work of art. After all the 'serious' stuff of joining in the Cornish Heritage Farm challenges which I did enjoy - I have decided a bit of messing about and experimenting time is called for.
Thursday, 30 July 2009
CHF Challenge - One Sheet Wonder
This is the last week of the Summer Challenges on the Cornish Heritage Farm site.
It has been great fun joining in, and really stretched me.
The other entries have been amazing, I am totally out of my league, but I am (almost) always up for a challenge.
I didn't have a clue what a 'One sheet wonder' was! In case you don't know either - you have to make you own background sheet using stamps and then cut it up and use all the bits. -Well all of them that are usable - not little tiny odd shaped scraps of course.
I managed to use all mine up, and here are the things I made, using the Lace Background stamp from Cornish Heritage Farm.
They had to be featured in one photo - for their gallery - but you can see my entries individually below in other posts.
Oh dear - this photo doesn't do them justice - I did try but just couldn't arrange them all together so that you could see each one - this is the best I could do!
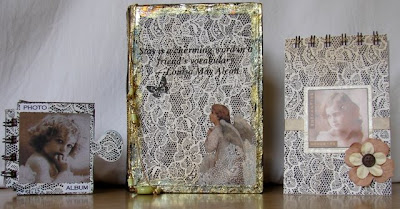
L-R
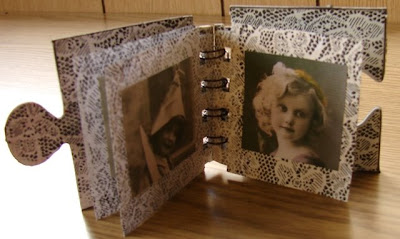
A little jigsaw puzzle photo album featuring 10 exquisite photos of vintage boys and girls, and used up all the little bits of stamped card - the inner pages I stamped on the reverse too.
In the middle is an altered book which is a jewellery box. I painted the outer covers black, and added the lace stamped card to the covers, a rub on which says, "Stay is a charming word in a friends vocabulary". The butterfly is stamped on, and the angel is a rub on. I used silver 'leaf' around the edges which has the colours of the rainbow in it when it catches the light. The spine of the 'book' is covered with a cream ribbon which I stamped with the lace stamp too.
On the right is a note book I made with my BIA. Again using a piece of the 'one sheet wonder' card, mounted on a piece of mountboard. The vintage photo is a lovely deep sepia colour - darker that it looks in the photo (it's facing the sunshine) and is more the colour of the photo album.
Jigsaw Puzzle Photo Album
I have made this little jigsaw puzzle photo album using the lace background stamp from Cornish Heritage Farm
This is only a sneak preview as I am entering it into a swap and don't want to totally spoil the surprise.
In all there are ten vintage prints
Of utterly divine little boys and girls
I don't really want to part with it - but I must!
This is only a sneak preview as I am entering it into a swap and don't want to totally spoil the surprise.
In all there are ten vintage prints
Of utterly divine little boys and girls
I don't really want to part with it - but I must!
My first go at. the UK Stampers Challenge
Over on the UK Stampers Blog the challenge this week is to make a tag - with the letter G for graffiti.
I took one look at a Tim Holtz stamp, and thought I would be a little devil and do the unthinkable
I 'graffiti-ed' it!
True to his techniques, I scrunched up a cardboard tag, smoothed it out and coloured it with Adirondack inks - and the 'untouched' wording of the stamp sums up Graffiti exactly!
I took one look at a Tim Holtz stamp, and thought I would be a little devil and do the unthinkable
I 'graffiti-ed' it!
True to his techniques, I scrunched up a cardboard tag, smoothed it out and coloured it with Adirondack inks - and the 'untouched' wording of the stamp sums up Graffiti exactly!
Wednesday, 29 July 2009
Summertime
I really, really, really fell in love with Jo Capper Sandon's Summertime work of art. I even bought the book that her image came from, stamps and other things whilst I was visiting Crafty Individuals site.
I tried to make a beach hut without success so decided to try something else.
I have had this old picture frame which I bought from a charity shop for £1 for ages. I nearly threw it out when I had my clear out a few weeks ago. It was rough wood.
So I painted it with Gesso, a couple of coats. Then when dry I painted it with PVA glue (cos I don't have any crackle paints and I wanted it to look really weathered and battered.) Then I painted on top of the glue with blue acrylic paint whilst it was still wet and left it overnight to dry.
Then roughed it up a bit with sandpaper.
Today I did the 'inside'. Ran some paper through the embossing machine, then coloured it with chalk ink.
Inked sheet of paper and used my mermaid stamp. Now comes the difficult bit (apart from the fact that I will have to take the frame apart again as the picture looks slightly more to the left in the photo - but it might be just the angle I took it at. It probably is cos it looked fine at the time)
Now this is where I need your help or suggestions. What do I do next? What is it that you clever people do to turn an OK but of work to something better.
Because I just don't have the imagination to add something to give it a bit of pazzazz!
Anything I put on the frame tends to take the eye away from the stamped image. So I have just been putting things on and taking them off - not stuck anything on yet.
I do have some 'leaf' which is pewter with watery colours - like those you see in a puddle after a rain storm - might try odd bits here and there along the grain.
(I will give this as a present, so the recipient can put in a photo taken by the seaside by the way)
I need all the inspiration I can get.............
Gozzie, a rare Rosecomb bantam hen of mine - and getting rather old - decided to watch me crafting perched outside on the window ledge and squashed right up against the pane so's she didn't fall off.
I do need all the help I can get, but it can be a bit off-putting, getting the beady eye treatment!
So I went outside and lifted her off - I couldn't concentrate!
Something different
I was up at dawn this morning - 4am - so half the day seemed to be over by 9am LOL so I trotted off in the rain to the end of my garden to play in my studio.
TAg - using Tim Holtz stamps from Happy Daze
Saturday, 25 July 2009
Cornish Heritage Farm - Summer Challenge
Another of the pieces I have made with the stamped 12x12 card using the Lace background stamp for the Cornish Heritage Summer Challenge
I still have more of the stamped card to use up - so will have to get my thinking cap on!
Thursday, 23 July 2009
CHF Challenge
Last night I decided to make a start on next weeks Cornish Heritage Farm Summer Challenge .
I have used their Lace background stamp to stamp onto a 12"x12" sheet of card, and now 'all' I have to do is to use it up making different things.
My first project was to cover a book box. I painted it black, covered the front and back with the lace stamped paper, and stamped wide cream ribbon for the spine.
It is now a jewellery box
I 'antiqued' it with coloured pewter metal leaf - from the same range you buy the gold leaf paper from - it looks lovely in the sunshine as it catches all the colours of the rainbow.
The Angel is a rub on, so too the saying. "Stay is a charming word in a friends vocabulary". The little butterfly I stamped on.
Wednesday, 22 July 2009
Take time to enjoy your day - CHF Challenge
Each week I have been joining in the weekly Cornish Heritage Farm Summer Challenge and I have found each one more difficult than the last.
This challenge especially so.
It is called 'Make a Scene' and the challenge is to make a scene with a least one (or more) stamps from the CHF range.
I haven't had time to build up the collection of stamps - yet - from Cornish Heritage, so have been limited with what I can do!
I was really stuck with this one - until last night - when I was out in my studio in the garden and saw the sunset - and started to day dream.
The stamp I have used is from the Rummage Bin and called 'Sweet Little One'. It's a collage stamp - so I have just used a small portion of it. The little girl crouching.
So I daydreamed about a little girl playing out in the meadow on the farm, having a wonderful time - until mummy calls her in for bed time. She crouches down and plays hide and seek waiting for her mum to find her, almost camouflaged in her pink dress, and the wild flowers, and the reflection of the sun as dusk begins to fall. You can almost feel the anticipation on her face as she is keeping as quiet as she can - and wondering if mummy will find her - which of course she does, sweeping her up off her feet, giggling as she is carried indoors for supper.
Saturday, 18 July 2009
Messing about with metal - Experiment.3
I punched a 2" disc out of some thick copper which I have had for over 30 years, and had forgotten all about it until recently, when an article on Time for Crafting reminded me, so I had a rummage and found it.
I ran it through my Wizard machine with an embossing plate, and coloured it with alcohol inks. I think that I might hammer it a bit to make the butterfly's body. I think it would look better
ATC
I haven't made an ATC for ages, but after being stuck for ideas I decided to download a free image and background paper and have a go.
I tried out the Tim Holtz method of shading/colouring using a sponge and ink on a craft mat. It was fun once I got the hang of it.
I might use this on a card or a box in the future, but for now will keep it as a sample of the technique.
I tried out the Tim Holtz method of shading/colouring using a sponge and ink on a craft mat. It was fun once I got the hang of it.
I might use this on a card or a box in the future, but for now will keep it as a sample of the technique.
Experimenting with metal - 2
More inspiration from Time for Crafting
A square of tin coloured with a mixture of alcohol inks, run through a Cuttlebug embossing folder, then rubbed like crazy with a piece of sandpaper - ruining my nails!
Messing about with metal - Experiment.1.
This wooden model reminds me of Posh Spice for some reason. Every day that I am in my studio I change it's pose. I know it is childish, but it gets manoeuvred into some very weird positions and it really makes me smile!
Today it is 'modelling' an experimental piece of metal work I did today. It took me hours and nearly ended up in the bin on several occasions!
On the Time for Crafting site Sara has featured metal work in her latest magazine, so I thought I would try out different ways of using it.
I tried painting it red with alcohol inks, but couldn't get a nice finish. Then I tried highlighting just the roses and wording - but easier said than done.
So I ended up cleaning it all off, 'hammering' with a pointy thing from the garage, painted it black, then sanded it off.
Friday, 17 July 2009
Cornish Heritage Farm - Summer Challenge
I have been joining in the weekly Cornish Heritage Farm Summer Challenge and quite a challenge it has turned out to be - for me!
For a start, I hadn't made many cards - and now I am 'forced' to make one each week. I could made an alternative project, but I really haven't had the time.
I was out this morning, and lunch time and early afternoon we had the most horrendous storm again, right over where I live. The power kept going off - and we got hailstones again, and the roof leaked in the conservatory at one end - because they haven't been yet to repair the last damage.
But - I was able to protect the chair and catch the water - so no big deal, nothing got soaked except some towels.
It did give me the opportunity to try out the 'Resist' challenge for this week!
Oh my gosh - did I find it hard! Had several attempts - and this is my final effort.
Using a lace background stamp from Cornish Heritage Farm, I stamped in clear ink onto card stock, used clear embossing powder, and heated from the reverse (as per instructions on a tutorial on their site (using different stamps).
I inked over it with Hazelnut, then ironed off the embossing powder. The other two CHF stamps you have seen me use before - and these were stamped in the usual way.
I mounted them all onto a deep purple/maroon card which I had previously stamped with Hazelnut using the Lace background stamp, so the pattern is the reverse to that of the white backing paper. I 'grunged' the little label on the tag I made too.
It is a nice effect in real life.
Looking through some magazines as I was sorting out, I noticed that the 'in thing' seems to be scattering a few petals around your art work - so I scattered all the ones I have - and luckily the colour matched - perhaps it will get my entry noticed for all the right reasons this week. LOL
Will this inspire me I wonder?
I have had a really hectic week, with mostly just the evenings at home, and those evenings I have spent sorting out storage for my studio and getting more organized
It didn't cost much to do - all the units were a bargain price and came ready assembled. I just need to label all the drawers and sort out the corner which you can't see!
I am the sort of person that can't stand working in a mess - I like to be organized, and be able to find things quickly and easily - especially as my memory is not what it used to be.
Hopefully this will inspire me to use up all the things that I have found.
And of course - in the coming months, fill up those empty drawers with stash if I am lucky!
Sunday, 12 July 2009
Hmm - not sure if I should post this experiment...
I stamped on some silk like material and mounted it on padding and board.
Then I created a row of hearts at the bottom out of chicken wire
I then spent hours embossing copper, painting it, and cutting out hearts.
I learned such a lot - made lots of mistakes - but had fun.
And I tidied up the back.
And made a red wire hanger.
I am treating this as a practice run - for something I want to make for a ruby wedding.
Friday, 10 July 2009
Door Hanger - CHF stamp.
I painted the wooden door hanger above with pale pink acrylic paint - then, using a stamp from the Rummage Bin range at Cornish Heritage Farms stamped part of it on the lower half of the door hanger. The colours are a little darker than shown here - the wooden planking behind the little girl is a deeper brown for example. I used Ecoline inks for the colouring.
I masked the bottom then stamped the top half, and finished it off with a satin ribbon and little gemstones.
Thursday, 9 July 2009
Paper piecing at 4am in the morning - for CHF
I woke up early this morning and just could not sleep - so got up, let my chickens out of their run which looks much like this in the stamped image, then headed for my studio and experimented with paper piecing for the Cornish Heritage Farm challenge which is taking place this summer.
I haven't been able to do any crafting or much else this week - so it was really good to have a play again.
This stamp is from their Rummage Bin range, and I just had to have it!
Paper piecing is when you stamp on different sheets of paper with the same stamp, and then cut out different elements of each one to form one picture.
I stamped a number of times on a 12x12 sheet of Basic Grey 'Perhaps' which has large stylised flowers on it in 'blobs' of shades of pink, also 'blobs' of greens and browns and blues.
Because of the intricacy of this collage stamp, I found it really difficult and tricky to cut out and around each part of the image. Ditto the tee-shirts - and trying to cut out that wording - took so many attempts!
For instance - either side of the chicken wire fencing in the background - very hard to cut around their heads and arms with out lopping off something I shouldn't and to get it to butt up tight to their faces and heads and arms, and to layer it all so that it looks seamless and 'flat' was quite a challenge for me - but I felt a buzz of achievement when I finally finished it.
The first stamped image was on textured cream card - although it looks white in my photo tsk. I coloured the arms and faces in a pale pink blusher and shaded them.
The chicken run is a darker brown than in the photo - and this I cut out after stamping on a plain sheet of brown paper.
All the other pieces are from the Basic Grey sheet. The backing paper is K&Co printed on Vellum.
I used floristry antique gold chicken wire to mount it on - but I am not sure that it works.
This is the 'naked' version - which do you think is best.
The challenge is just a bit of fun - but there are prizes each week - I am not holding my breath for any of those LOL - pop over and take a look at the gallery with the entries in - my there are some extremely talented ladies on there.
What this is doing, is getting me to make the effort to try different things with my limited CHF stamps, and to do something every week!
Friday, 3 July 2009
Blog Candy at The Purple Zone
The is a lot of inspiration on The Purple Zone blog, and to celebrate 'Purpleiscious' birthday she has a great giveaway.
Pop over and take a look.
Thursday, 2 July 2009
Cornish Heritage Farm - Boys will be Boys
If at first you don't succeed!
Give up!
This is my last attempt at this week's summer challenge at Cornish Heritage Farm - colouring.
Now all I have to do is to decide which one to enter.
I am so rubbish at taking photos - I took 20 before I ended up with this one - and then the colours don't show true. They are much richer, with more contrast between light and dark. Hey Ho - its just for fun, and I did have fun experimenting with pastel chalks.
Stamps
Cornish Heritage 'Boys will be boys' and 'Take time to enjoy your day'
Backing card
Basic Grey which has been heavily coloured in shades to match the little boy's outfit and to add a bit of depth as it looked a bit flat.
Wednesday, 1 July 2009
Yet another go at a CHF Rummage bin stamp
Joanne is a member of the design team on the Cornish Heritage Farm site who are running a summer challenge - you can read all about it on her blog.
I am trying to create something to enter - just for fun as if you pop over there and take a look at their gallery - the standard of work is amazing.
I digress!
Joanne has made a card for this weeks challenge as an incentive for 'us' to have a go.
So - using her idea of shape of the card - I have had a go this afternoon making this one. If only I had a webcam in my studio shed - you would be in hysterics of laughter watching me fill up my bin with rejects.
This is my last attempt - as I have run out of days now to make anything else - my next task is find out how to upload stuff to a gallery LOL
Stamp by Cornish Heritage Stamps
Sweet little one - in the Rummage Bin
Colours
All pastel chalks applied with a cotton bud onto textured water colour paper
Other
Shape cut out with Labels One Nestabilities
Cornish Heritage Farm - Boys will be Boys
I am trying to be more versatile with my stamps - rather than just stamping the image and not thinking laterally.
I am determined to master making cards too!
The little boy stamp is part of 'Boys will be boys' from the Cornish Heritage Farm
I stamped out the collage stamp onto white card, then cut out the section I wanted.
I coloured him using pastel chalks and just kept adding more until I got the depth I wanted.
I chose a backing paper which toned in with his red top and blue trousers and stamped over it with a chalk green colour to soften the lines and pattern.
In hindsight the 'One penny for your thoughts' is stamped too low - I tried it higher but it didn't look right, and embossing it with black embossing powder makes the wording look too prominent.
But - it's all a learning curve for me - and I am happy that I made it.
Subscribe to:
Posts (Atom)