Polymer Clay - starting at the beginning!
I just want to dive in and produce brilliant things - but it's not working out that way!
I have some books, I have some clays, I have a pasta machine, I have the oven, but I still seem to be lacking in tools - which I found out when I started! So I have been ordering the other bits and pieces that are necessary.
I have taught myself the very basics, but it's all going so slowly! The clay needs quite a bit of 'conditioning' done that - there are lots of different clays for different things - I know that now!
These are called bicone beads!
The hole looks huge - it isn't it's the size of a pin pushed through - these beads are small. To make them you mix your clay strips together, make a small ball, lay it on the work surface, place a piece of perspex on top and roll it around - and it ends up looking like a little flying saucer!
This one hasn't been sanded yet! When it has the lip around the hole will disappear.
More experiments....
This time using air dry black clay. Which means it doesn't need baking.
What it didn't say on the packet was how long it takes to dry - so I have done these all wrong!
I rolled it out to condition it - it's very sticky so not as easy to work with. I left the pieces overnight before colouring them in gold, and silver rub and buff and leaving that to dry, before rubbing them.
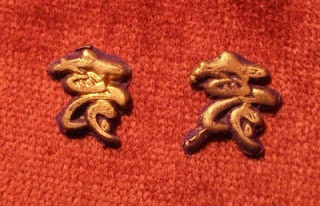
These items are meant to be faux historic finds - I know, but I'm only playing with these!
Little Japanese faux metal calligraphy (but I have just noticed that I need to cut off the extra 'leg' on the piece on the right - doh!)

This is a work in progress. I stamped on some black air dry clay and used rub and buff again, and added the lovely inchie which I have had for a few years now which I received from Hilda in a swap. I need to fill in the grooves with something - maybe beads or something - and add another layer of R&B.
So the things I did wrong was because I didn't find out about it until I had seen a post on a forum:- The black air dry clay about takes 'a few days' to dry. You have to keep turning it so that it dries all the way through as it has a high moisture content - and you must NOT paint it or anything until after a few days. Oh well - at least I know what not to do now!


12 comments:
Busy bee you!
Such variety too.
Have a lovely weekend,
Sandie xx
Well done Lottie, they all look great to me
If that's your 'learning' - I think it's pretty darned good! I can see you're having fun.
Oh wow! These all look fab :-) I bet you had fun with this little lot! Love 'n' hugs, Mel xx
I am thinking about playing with clay and like what you have done so far. I did not know about the sanding, drilling and polishing and drying.
WOW Lottie, this looks like you had sooo much fun.
I just love the way you get stuck in with something new. You really go for it and don't just try one thing you really experiment with it.
All your pieces look fab, and I personally wouldn't worry that you didn't let the clay dry properly. It looks okay from the photos, so if it's usable - use it!!!
Can't wait to see what you do next.
Sam xxxx
Love the colour of your bicones. And all the other projects are fab too. I've not played with clay so I shall be interested to watch how your progress. xx
Love the results of your learning curve - thanks so much for sharing.
Ooh! this looks very exciting. I have joined you as a follower and will return later to have a good read. I shall be bringing tea and biscuits xx
Looks like you're having fun and these all look good - the black air dry with the inchie is my favourite! Sanding beads of that size sounds tedious, rather you than me! (do you have a pebble polisher?)
This is fascinating and even your trial pieces are exquisite Lottie.
OOOO love these Lottie lainey x
Post a Comment